Best light for horse photos: 7 Essential & Effective Tips
The best light for horse photos is typically soft, indirect light, such as that found during the golden hours (shortly after sunrise and before sunset) or on a slightly overcast day. This type of lighting minimizes harsh shadows and creates a flattering, even illumination that enhances the horse’s features and coat.
Understanding the Importance of Light in Horse Photography
Light is arguably the most critical element in photography, and this holds especially true when photographing horses. The quality, direction, and intensity of light dramatically affect the mood, detail, and overall impact of your equine images. Without proper lighting, even the most majestic horse can appear dull and uninspiring.
Think of light as the sculptor of your image. It defines shapes, reveals textures, and creates contrast. Poor lighting can flatten an image, hide important details, and introduce distracting shadows. Conversely, well-managed light can accentuate the horse’s musculature, highlight its expressive eyes, and create a sense of depth and dimension. Good lighting transforms a simple snapshot into a captivating work of art.
How Light Affects the Mood of Your Photos
The type of light you use can significantly influence the mood of your photographs. For instance, warm, golden light evokes feelings of tranquility and serenity, making it ideal for portraits or pastoral scenes. Cool, blue light can create a sense of drama or mystery, suitable for action shots or moody compositions. Consider the emotions you want to convey and choose your lighting accordingly.
- Warm light (golden hour): Creates a soft, romantic, and peaceful atmosphere.
- Cool light (overcast day): Provides a balanced, neutral tone, ideal for showcasing details and textures.
- Harsh light (midday sun): Can create strong shadows and highlights, leading to a contrasty and often unflattering image.
The interplay of light and shadow is crucial. Shadows define form and add depth, while highlights draw the eye to key areas. Mastering this balance is essential for creating visually compelling horse photos. Understanding how light interacts with the horse’s coat, musculature, and surroundings allows you to control the narrative and evoke the desired emotions.

The Golden Hours: Ideal Times for Best light for horse photos
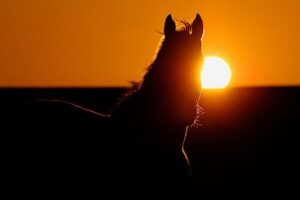
The “golden hours,” occurring shortly after sunrise and before sunset, are widely considered the best times for outdoor photography. During these periods, the sun is low on the horizon, casting a warm, soft, and diffused light. This light is incredibly flattering to horses, minimizing harsh shadows and creating a beautiful, even illumination.
The angle of the light during the golden hours also adds depth and dimension to your images. The long shadows cast by the low sun accentuate the horse’s form, highlighting its musculature and creating a sense of three-dimensionality. This is particularly beneficial for capturing dynamic action shots or showcasing the horse’s conformation.
Benefits of Shooting During the Golden Hours
There are several key benefits to photographing horses during the golden hours:
- Soft, diffused light: Minimizes harsh shadows and creates a flattering, even illumination.
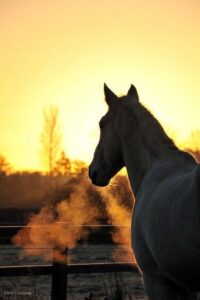
- Warm color temperature: Adds a golden hue to the images, enhancing the horse’s coat and creating a sense of warmth and serenity.
- Long shadows: Accentuate the horse’s form and add depth to the images.
- Reduced glare: Makes it easier for the horse to remain comfortable and relaxed during the shoot.
Planning your horse photography sessions around the golden hours can significantly improve the quality of your images. Use a weather app or website to determine the exact sunrise and sunset times for your location. Arrive at your chosen location early to scout the area and prepare your equipment. Be mindful of the rapidly changing light during these periods and adjust your camera settings accordingly.
Golden hour light also allows for stunning backlighting opportunities. Positioning the horse with the sun behind it can create a beautiful rim light effect, separating the horse from the background and adding a touch of magic to the image. Experiment with different angles and compositions to find the most flattering and visually appealing results. Remember to protect your lens from direct sunlight to avoid lens flare.
Overcast Days: A Surprisingly Good Option
While the golden hours are often touted as the ideal time for horse photography, overcast days can also provide surprisingly excellent lighting conditions. An overcast sky acts as a giant softbox, diffusing the sunlight and creating a soft, even illumination. This type of light is particularly beneficial for capturing details and textures, as it minimizes harsh shadows and highlights.
Overcast days are especially useful for photographing horses with dark coats, as they prevent the highlights from being blown out and allow you to capture the full range of tones. The even lighting also makes it easier to achieve accurate color rendition, ensuring that the horse’s coat color is accurately represented in the final image.
Advantages of Overcast Lighting
Here’s why overcast days can be a photographer’s friend:
- Even illumination: Minimizes harsh shadows and highlights, making it easier to capture details and textures.
- Accurate color rendition: Ensures that the horse’s coat color is accurately represented in the final image.
- Reduced glare: Makes it easier for the horse to remain comfortable and relaxed during the shoot.
- Flexibility: Allows you to shoot at any time of day without worrying about harsh sunlight.
When shooting on an overcast day, be mindful of the overall brightness of the scene. You may need to increase your ISO or widen your aperture to compensate for the reduced light levels. Also, consider using a polarizing filter to reduce glare and enhance the colors in your images. A polarizing filter can cut through the haze and reveal the true vibrancy of the scene.
Don’t be afraid to embrace the subtle beauty of overcast lighting. It can create a soft, ethereal mood that is perfect for capturing the gentle nature of horses. Experiment with different compositions and angles to find the most flattering and visually appealing results. Sometimes, the most beautiful images are created in the most unexpected conditions. Consider a private horse riding hurghada trip to capture some amazing photos.
Avoiding Harsh Sunlight: What to Watch Out For
Harsh sunlight, typically occurring during midday, is generally the least desirable lighting condition for horse photography. The intense, direct light creates strong shadows and highlights, which can be unflattering and distracting. It can also cause the horse to squint or become uncomfortable, making it difficult to capture a natural and relaxed expression.
The high contrast created by harsh sunlight can also make it challenging to achieve a balanced exposure. The highlights may be blown out, losing detail in the brightest areas, while the shadows may be too dark, obscuring important details. This can result in an image that lacks depth and dimension.
Problems with Harsh Sunlight
Here are some of the specific problems associated with harsh sunlight:
- Strong shadows: Can be unflattering and distracting, obscuring important details.
- Blown-out highlights: Loss of detail in the brightest areas of the image.
- Squinting and discomfort: Makes it difficult to capture a natural and relaxed expression.
- High contrast: Makes it challenging to achieve a balanced exposure.
If you must shoot in harsh sunlight, there are a few techniques you can use to mitigate its effects. One option is to find a shaded area, such as under a tree or inside a barn. This will diffuse the light and reduce the contrast. Another option is to use a reflector or fill flash to brighten the shadows and create a more balanced exposure. A reflector bounces sunlight back into the shadows, while a fill flash adds a subtle burst of light to fill in the dark areas.
Consider the horse’s comfort and well-being when shooting in harsh sunlight. Provide plenty of water and shade, and avoid prolonged exposure to the sun. If the horse appears uncomfortable or stressed, it’s best to postpone the shoot to a more favorable time of day. Remember, the horse’s welfare should always be your top priority. You can also consider swimming with horses in hurghada for photos in a different element.
Using Reflectors and Fill Flash to Enhance Lighting
Reflectors and fill flash are valuable tools for enhancing lighting in horse photography, particularly in situations where the natural light is less than ideal. Reflectors are used to bounce sunlight back into the shadows, brightening them and creating a more balanced exposure. Fill flash is used to add a subtle burst of light to fill in the shadows, without overpowering the natural light.
Reflectors come in various sizes and shapes, with different surfaces that reflect light in different ways. A white reflector provides a soft, diffused light, while a silver reflector provides a brighter, more specular light. A gold reflector adds a warm tone to the light, which can be flattering to horses with warm-colored coats. Experiment with different reflectors to find the one that best suits your needs.
How to Use Reflectors and Fill Flash Effectively
Here’s a breakdown of how to use these tools:
- Reflectors: Position the reflector to bounce sunlight back into the shadows, aiming the reflected light at the horse’s face or body. Adjust the angle and distance of the reflector to achieve the desired effect.
- Fill flash: Set your flash to a low power setting and use it to add a subtle burst of light to fill in the shadows. Be careful not to overpower the natural light, as this can create an unnatural and unflattering look.
When using fill flash, it’s important to diffuse the light to prevent harsh shadows and highlights. You can use a diffuser attachment on your flash or bounce the flash off a nearby surface, such as a wall or ceiling. This will soften the light and create a more natural and flattering look. Consider a sunrise horse riding hurghada trip for unique lighting and photo opportunities.
Practice using reflectors and fill flash in different lighting conditions to master their effects. Experiment with different angles, distances, and power settings to find the techniques that work best for you. With practice, you can use these tools to create stunning and well-lit horse photos in any situation. Remember to always prioritize the horse’s comfort and well-being when using artificial lighting.
Indoor Lighting: Challenges and Solutions
Photographing horses indoors presents unique lighting challenges. Indoor environments often have limited natural light, and the available light may be uneven or unflattering. Fluorescent lights can cast a harsh, green tint, while incandescent lights can create a warm, yellow tone. Overcoming these challenges requires careful planning and the use of appropriate lighting techniques.
One solution is to supplement the available light with artificial lighting. Studio strobes or speedlights can provide a powerful and controllable light source. Use softboxes or umbrellas to diffuse the light and create a more even and flattering illumination. Position the lights carefully to avoid harsh shadows and highlights. A three-point lighting setup, consisting of a key light, fill light, and backlight, can be particularly effective for creating a balanced and well-lit image.
Tips for Indoor Horse Photography
Here are some tips to help you succeed with indoor horse photography:
- Use artificial lighting: Supplement the available light with studio strobes or speedlights.
- Diffuse the light: Use softboxes or umbrellas to create a more even and flattering illumination.
- Position the lights carefully: Avoid harsh shadows and highlights.
- Adjust your white balance: Correct for the color cast of the artificial lights.
- Increase your ISO: Compensate for the limited light levels.
When shooting indoors, it’s also important to adjust your camera’s white balance to compensate for the color cast of the artificial lights. Use a gray card or color checker to accurately measure the color temperature of the light and set your white balance accordingly. This will ensure that the colors in your images are accurately represented.
Be mindful of the horse’s comfort and well-being when using artificial lighting indoors. Avoid shining bright lights directly into the horse’s eyes, and provide plenty of ventilation to prevent overheating. If the horse appears uncomfortable or stressed, it’s best to take a break or postpone the shoot. Consider horse riding trips for outdoor photos with better lighting.
Common Lighting Mistakes in Horse Photography
Even experienced photographers can make mistakes when it comes to lighting in horse photography. Recognizing these common pitfalls can help you avoid them and improve the quality of your images. One common mistake is shooting in harsh sunlight without using any form of diffusion or fill light. This can result in unflattering shadows, blown-out highlights, and a generally unappealing image.
Another common mistake is using too much flash, which can create an unnatural and harsh look. Fill flash should be used subtly, just to brighten the shadows and create a more balanced exposure. Overpowering the natural light with flash can flatten the image and eliminate the sense of depth and dimension. It’s also important to avoid red-eye, which can be particularly noticeable in horses with light-colored eyes.
Mistakes to Avoid
Here’s a list of common lighting mistakes to steer clear of:
- Shooting in harsh sunlight without diffusion or fill light.
- Using too much flash.
- Ignoring the direction of the light.
- Failing to adjust the white balance.
- Not considering the horse’s comfort and well-being.
Ignoring the direction of the light is another common mistake. Light that is coming from behind the horse can create a beautiful rim light effect, but it can also result in a silhouette if the horse is not properly exposed. Light that is coming from the side can accentuate the horse’s form, but it can also create harsh shadows on one side of the face. Experiment with different lighting angles to find the most flattering and visually appealing results. You can also explore beach desert horse riding for photos in a unique environment.
Failing to adjust the white balance is another common mistake that can affect the color rendition in your images. Artificial lights, in particular, can cast a strong color tint, which can make the horse’s coat appear unnatural. Use a gray card or color checker to accurately measure the color temperature of the light and set your white balance accordingly. Remember, the horse’s comfort and well-being should always be your top priority. Avoid shining bright lights directly into the horse’s eyes, and provide plenty of ventilation to prevent overheating. If the horse appears uncomfortable or stressed, it’s best to take a break or postpone the shoot.
Frequently asked questions about Best light for horse photos
What is the best time of day for horse photography?
The golden hours, shortly after sunrise and before sunset, are generally considered the best times for horse photography due to the soft, warm, and diffused light.
Is it okay to photograph horses on overcast days?
Yes, overcast days can provide surprisingly good lighting conditions for horse photography, offering even illumination and minimizing harsh shadows.
How can I avoid harsh shadows when photographing horses in sunlight?
Use reflectors or fill flash to brighten the shadows, or find a shaded area to diffuse the light. Avoid shooting during midday when the sun is at its highest point.
What is fill flash and how do I use it for horse photography?
Fill flash is a technique used to add a subtle burst of light to fill in shadows, without overpowering the natural light. Set your flash to a low power setting and diffuse the light to avoid harsh shadows.
How can I improve the lighting in indoor horse photos?
Supplement the available light with artificial lighting, such as studio strobes or speedlights. Use softboxes or umbrellas to diffuse the light and create a more even illumination.
What are some common lighting mistakes to avoid in horse photography?
Avoid shooting in harsh sunlight without diffusion or fill light, using too much flash, ignoring the direction of the light, and failing to adjust the white balance.
How does the color of a horse’s coat affect the best lighting choices?
Dark coats benefit from even, diffused lighting (like overcast days) to prevent blown-out highlights, while lighter coats can handle slightly more direct light without losing detail. A gold reflector can add warmth to horses with warm-colored coats.
Can I use my smartphone for quality horse photos, or do I need a professional camera?
While professional cameras offer more control and higher image quality, modern smartphones can capture excellent horse photos, especially in good lighting conditions. Focus on composition and utilizing natural light effectively. Consider private horse riding hurghada.
Conclusion
Understanding and utilizing the best light for horse photos is crucial for capturing stunning and captivating images. Whether it’s the soft glow of the golden hours or the even illumination of an overcast day, mastering lighting techniques will elevate your equine photography.
Experiment with different lighting conditions and tools to discover your own style and create images that truly showcase the beauty and grace of these magnificent animals. Visit our website to learn more about our horse riding experiences and capture unforgettable moments. Book your ride today!